
I recently purchased the descriptively named “CrowPanel ESP32 2.13 E-paper HMI Display with 122*250 Resolution, Black/White Color Driven By SPI Interface” by Elecrow. I’ve been meaning to get one of these for a while to serve as a bedroom clock. Digital clocks either produce too much light or are too dim and have bad viewing angles (such as reflective LCDs). Analog clocks, on the other hand, make too much noise. Until now, I’ve just been using my phone to check the time, which does an adequate job in most situations. E-ink displays, also called e-paper displays, don’t produce any light and have great viewing angles. The catch is that when it’s really dark you can’t see the time at all, as it doesn’t emit any light. The best explanation I’ve heard for what an e-ink display is is an automatic Etch A Sketch. You use a magnetic charge to set the value of each pixel. There’s also a great video showing how the pixels change close up here: https://www.youtube.com/watch?v=1qIHCUWAgh4.
Why not simply buy an e-paper clock then? There actually is an e-ink clock already on the market: the Xiaomi Mijia Clock, available on AliExpress.
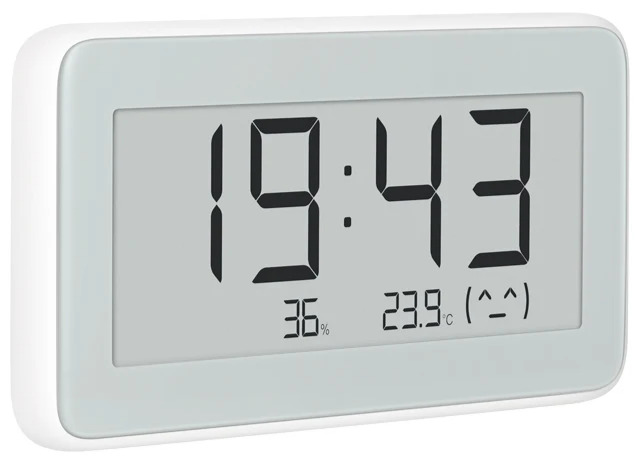
However, according to reviews, it only displays the time in China (UTC+8). This left me with no choice but to build the clock myself.
In terms of displays, there are several options, with the most popular being Waveshare. Elecrow’s offerings have a key advantage, however, in that they come with an ESP32 microcontroller built in. The microcontroller is what actually keeps track of time and tells the display what pixels to turn on.
I find this to be very pleasing as it means I don’t need to buy the display, a microcontroller, and the display HAT (Hardware Attached on Top) which connects the microcontroller to the display. Additionally, since all these products ship from China, it reduces the overall expected waiting time to buy it all in one package.
Also included is a USB-C port and USB A to C cable to connect the device to a computer. The device needs to be plugged in at all times as no battery is included.
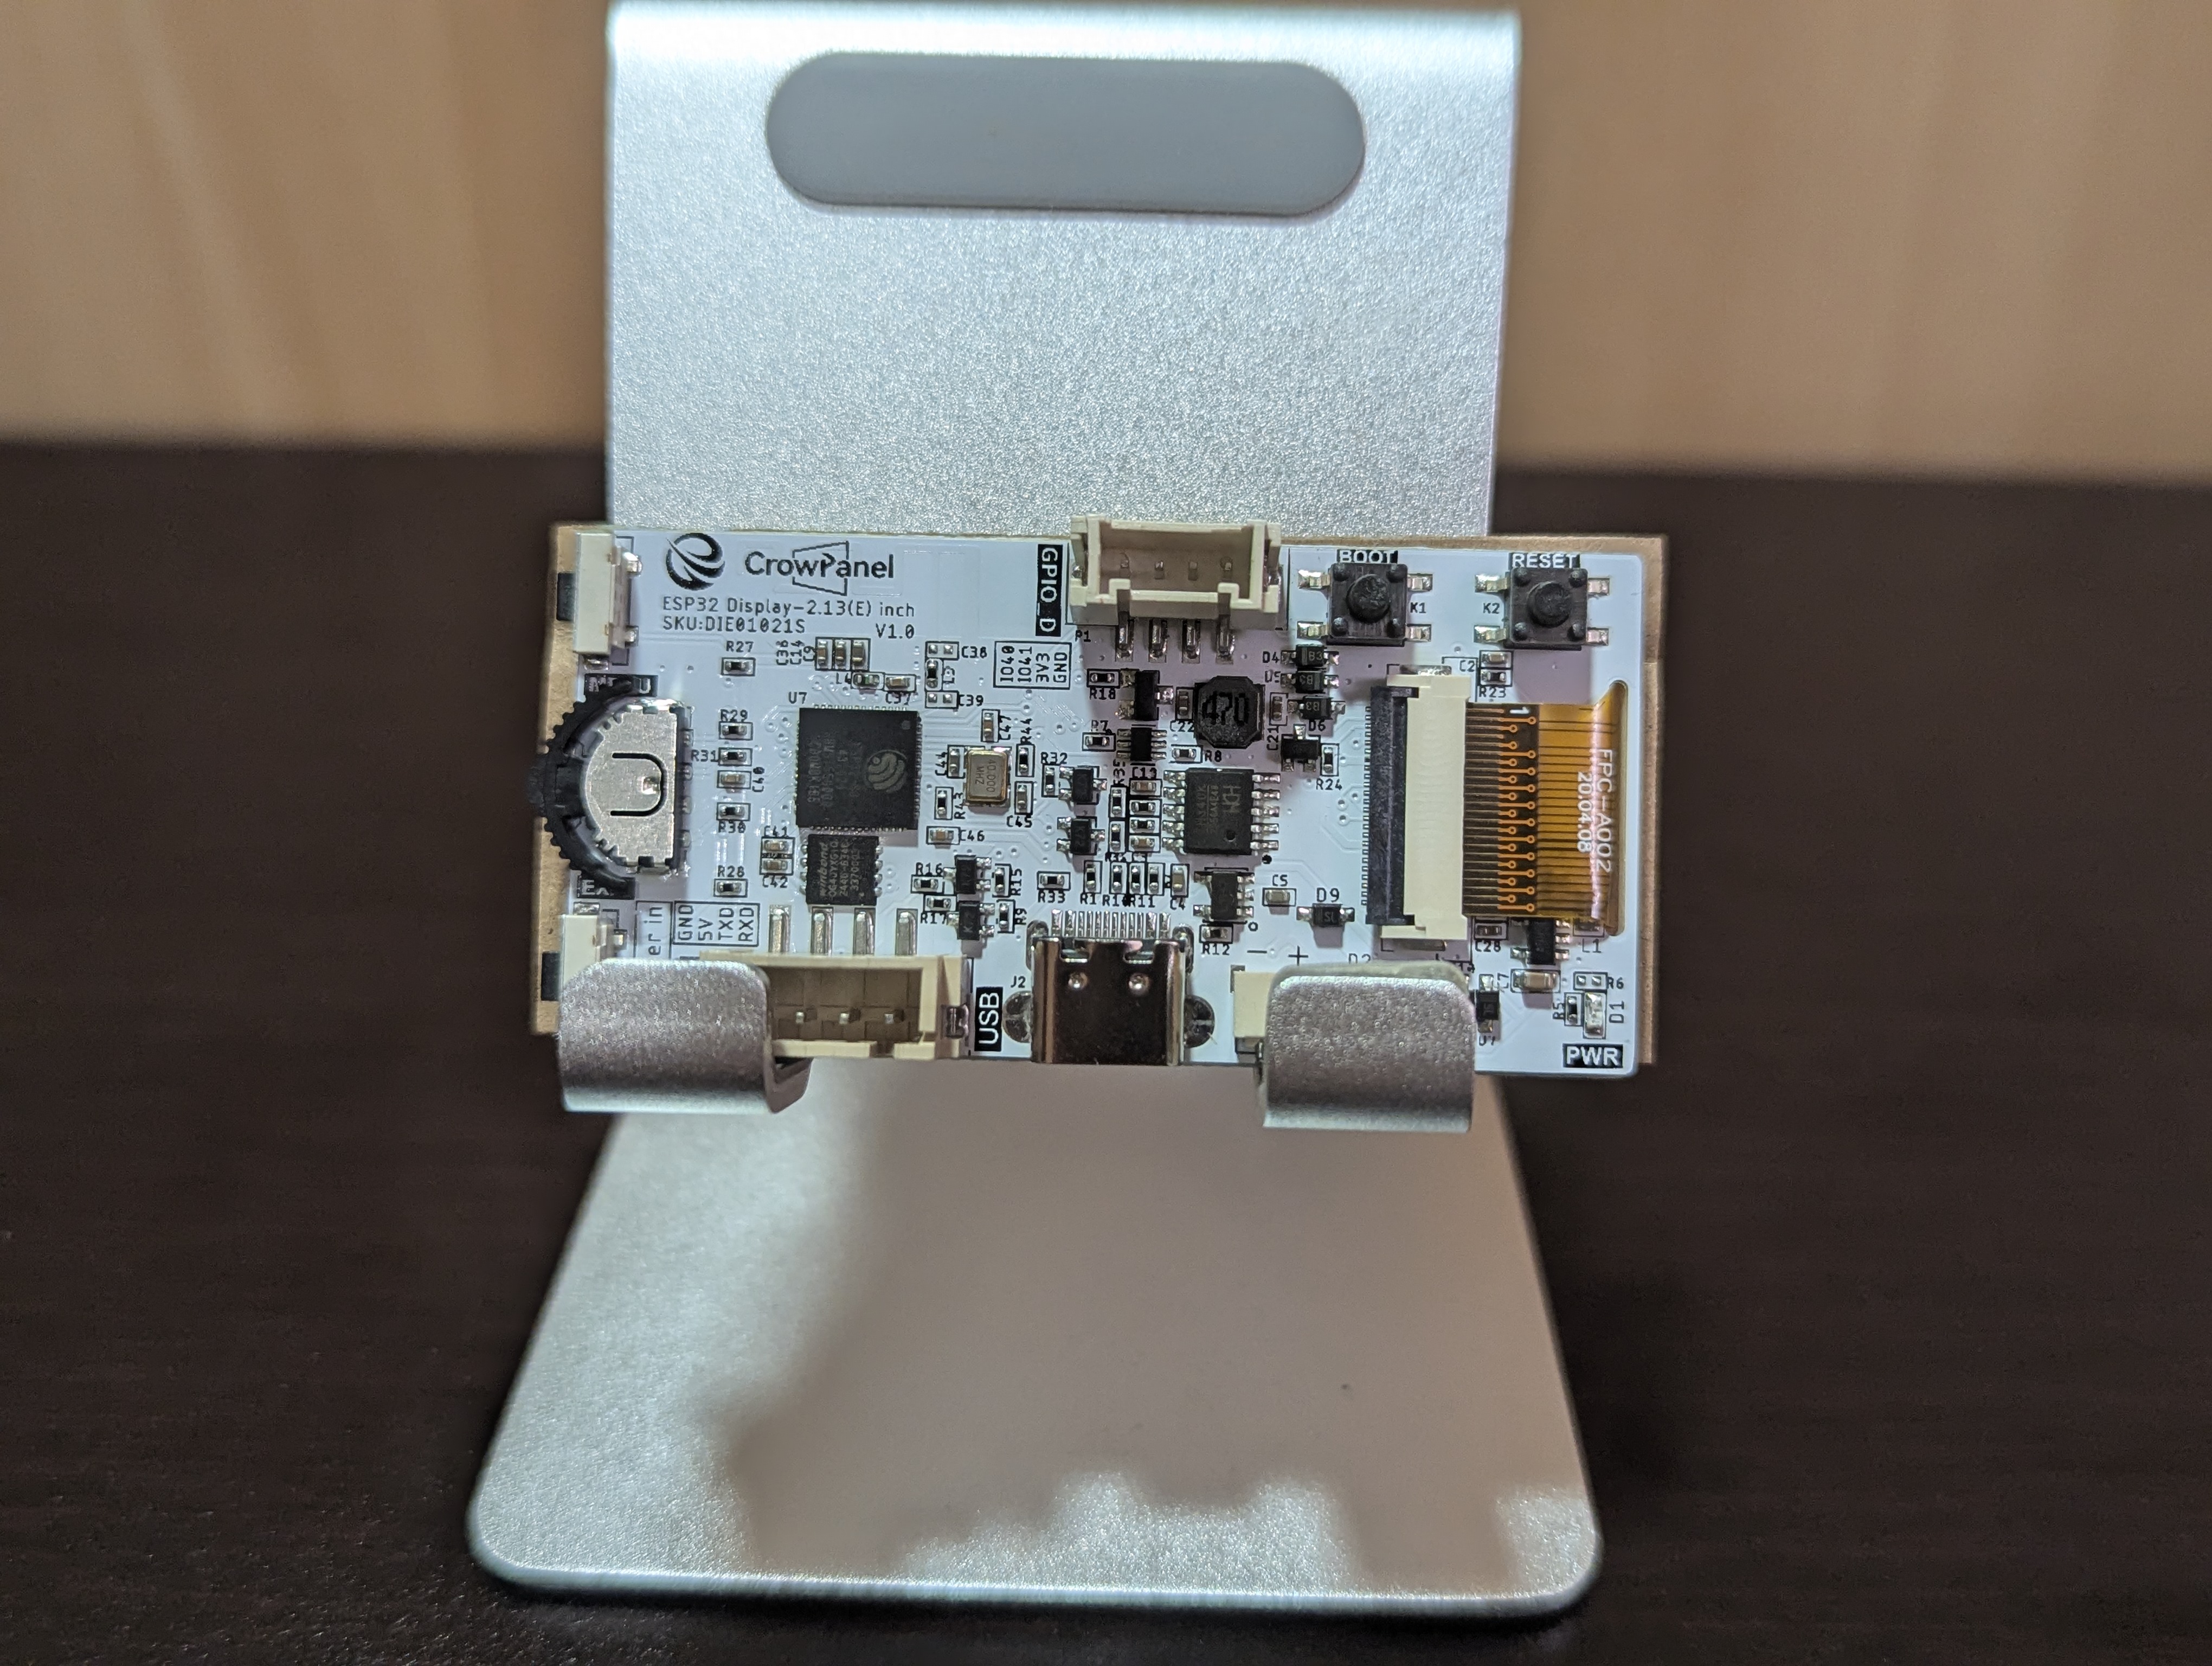
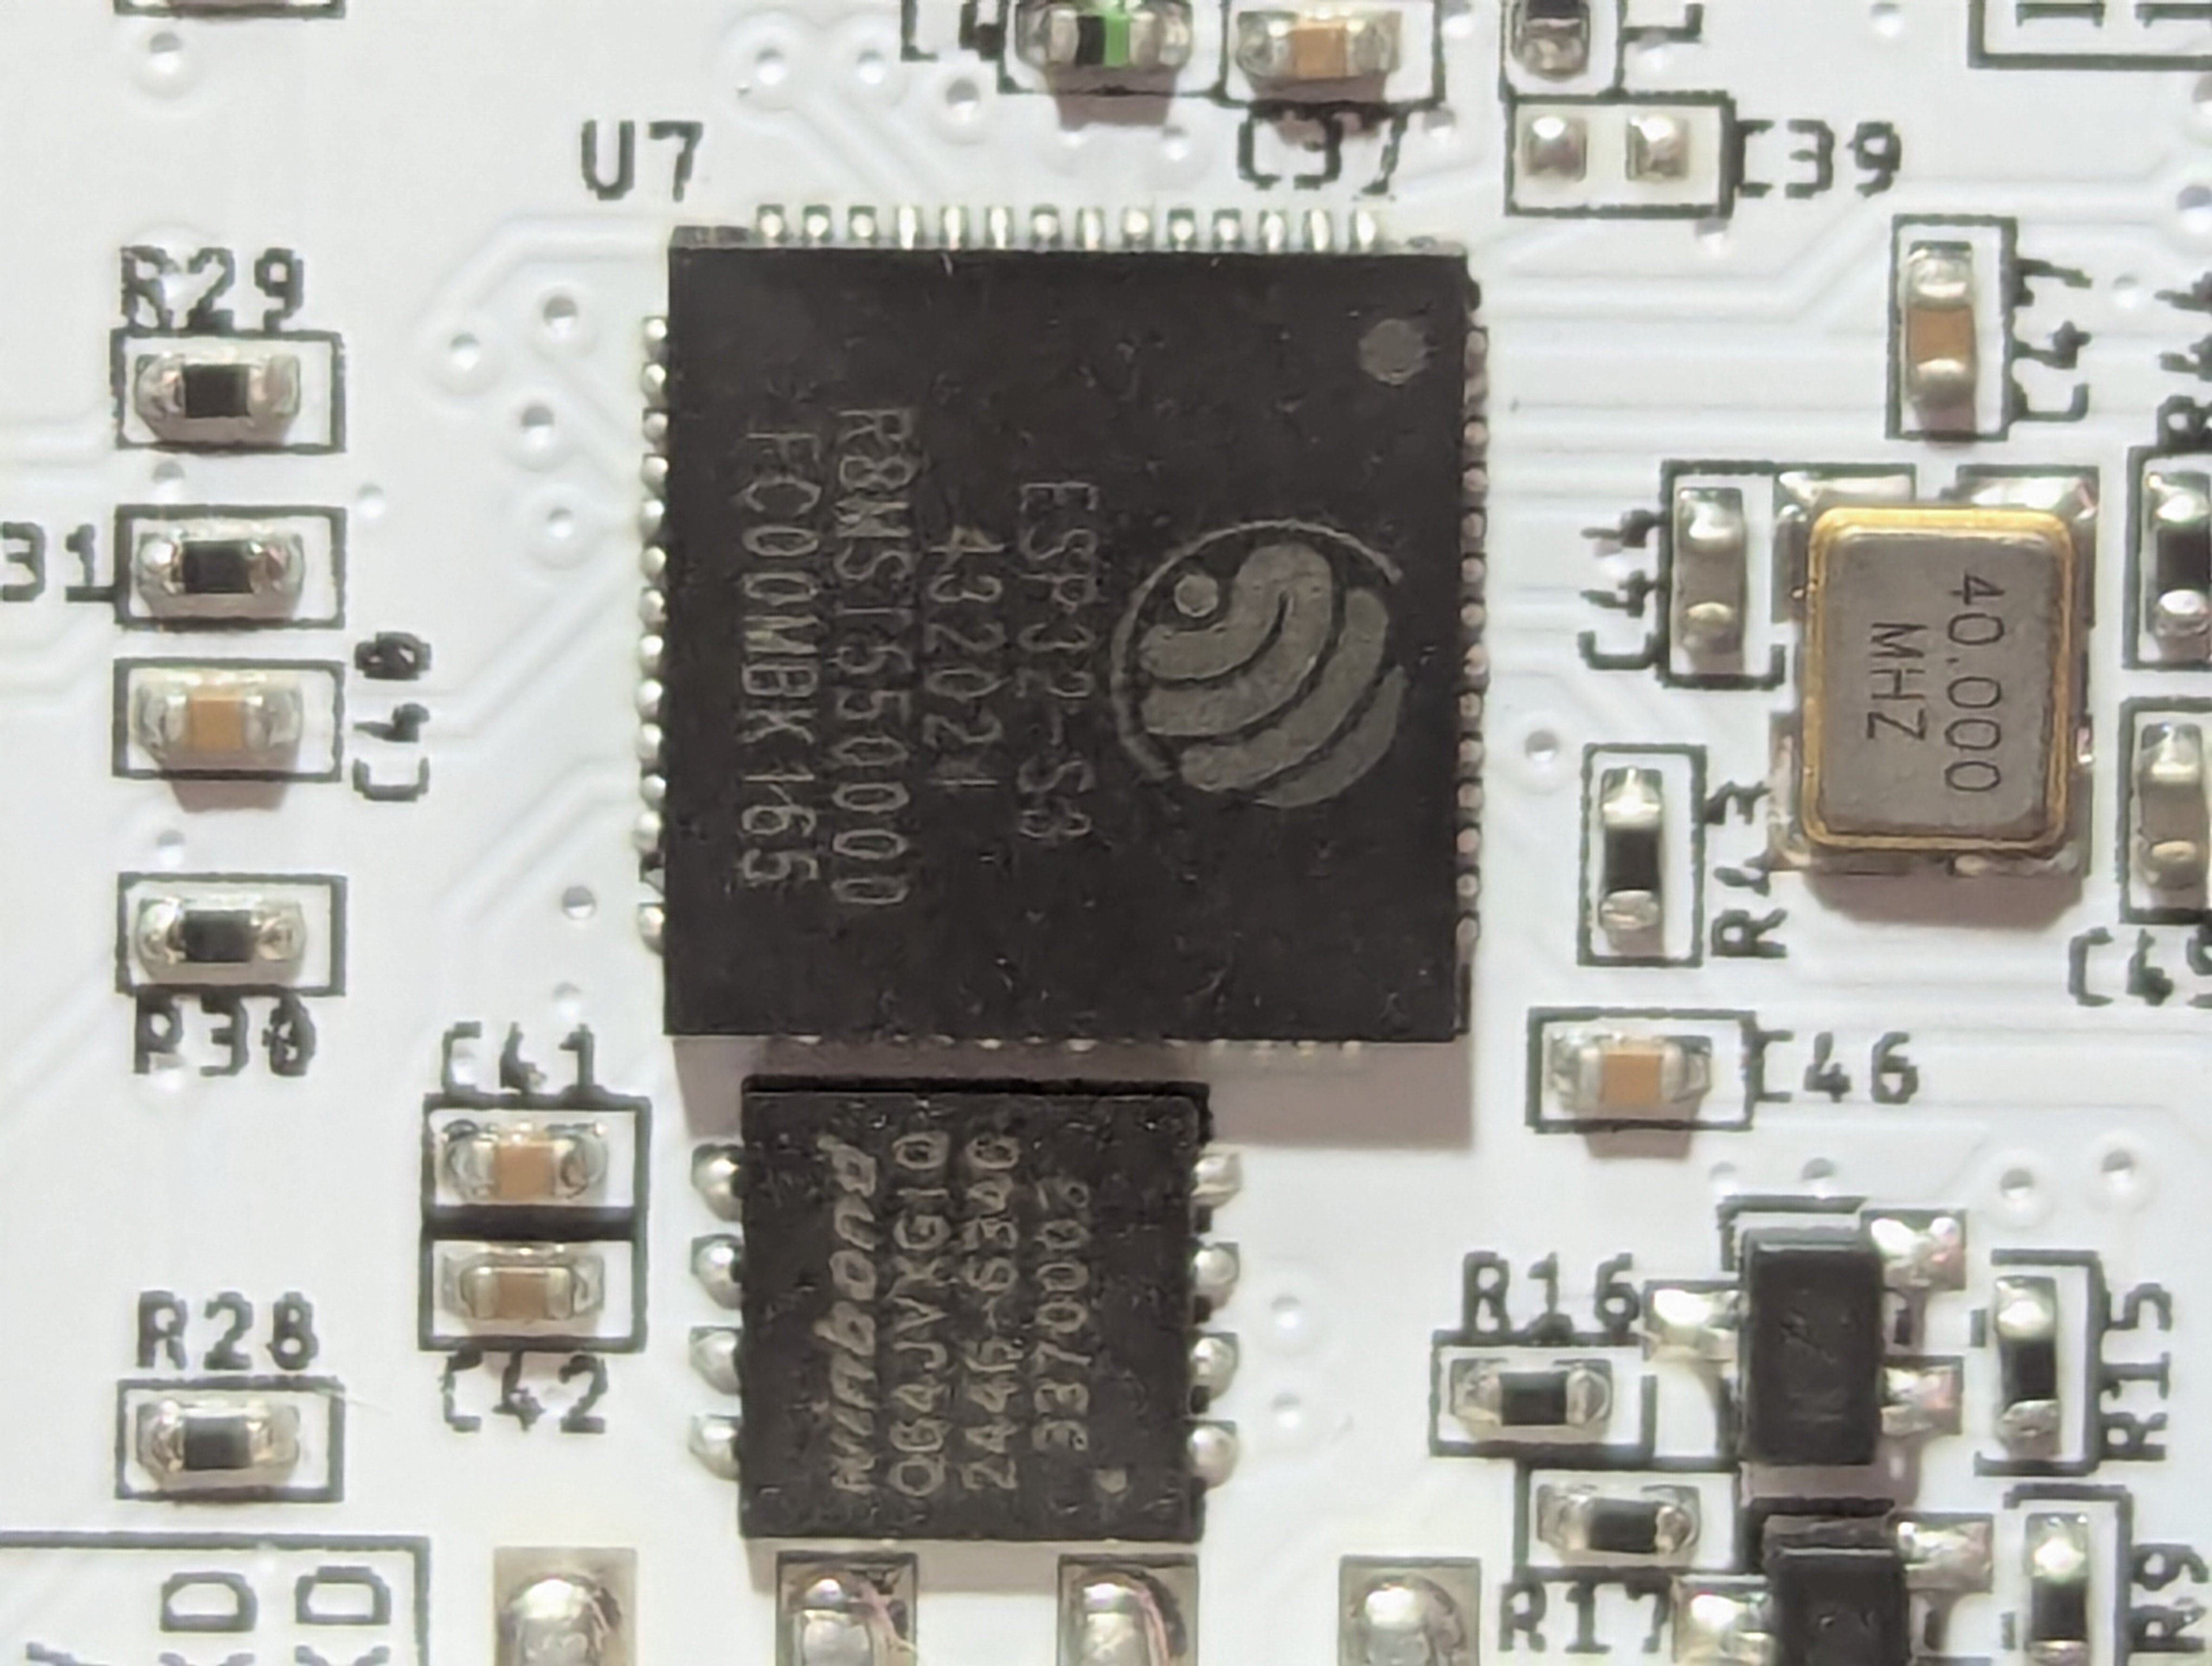
In my opinion, bundling a microcontroller with the display is a great idea and should be more common. If I had to guess, more than 90% of people buying a small e-paper display are going to use an ESP32 to drive it, and the ESP32s themselves are only about $3 each when purchased in bulk. The particular ESP32 used in the CrowPanel is the ESP32-S3. This uses the Xtensa ISA as opposed to the ESP32-C3, which uses the RISC-V ISA.
Developing for the CrowPanel is actually a very smooth experience, and I only ran into two issues during the entire project. Elecrow has a six-video tutorial series on the display here - https://www.youtube.com/playlist?list=PLwh4PlcPx2GdI_AT3WXtLRXiAxgFTiaJ- and has ample example code to start from. To summarize the intro video, you need to install the Arduino IDE, install the ESP-32 package, set your dev board to “ESPS32 Dev Module,” set the partition scheme to “Huge app (3MB),” set PSRAM to “OPI” and set the serial port to the port of your device. Then all you need to do is download their example projects https://github.com/Elecrow-RD/ESP32_S3-Ink-Screen and run them.
The first issue I ran into was that my laptop did not recognize the device. I tried every port and multiple cables, but device manager could not find a driver for the device. Luckily, the problem did not occur on my desktop PC, so I was able to use that. From some Googling, the issue might be that the device only supports USB 2.0, although I’m not sure.
Once the display is recognized, you can use the “refresh_time” example project to set up the clock. It also comes with weather and humidity display support via OpenWeatherMap, which I didn’t need.
The time is set by connecting to an NTP server. This is where the ESP32’s WiFi module comes into play. Of course, you need to give the device your SSID and password. The CrowPanel does come with a rotary switch which you could theoretically use to set the time manually. If you use the sample code, beware of a slight issue with the time update logic. Here’s how that looks:
unsigned long lastUpdateTime = 0;

void loop() {
  unsigned long currentTime = millis();

  if (currentTime - lastUpdateTime >= 60000) { // Execute every minute
    update_Display();   // update time
    lastUpdateTime = currentTime;
  }
}
The issue here is that millis() is using the device’s
internal clock, which is the number of milliseconds since the device
booted. This is separate from the actual time of day. Since the display
updates the current time every 60 seconds, that means that the clock
could be 0-59 seconds out of sync with the actual time, depending on how
many seconds into the minute the device booted. Instead, you want to
check the actual time of day against the last minute like so:
int last_min = -1;

void loop() {
  time_t t;
  time(&t);
  struct tm *timeinfo = localtime(&t);
  int current_min = timeinfo->tm_min;
  if(current_min != last_min){
    update_Display();
    last_min = current_min;
  }
}Now comes the real issue. Here’s the logic for displaying the time:
static char buff[20];
sprintf(buff, "%02d:%02d", timeinfo->tm_hour, timeinfo->tm_min);
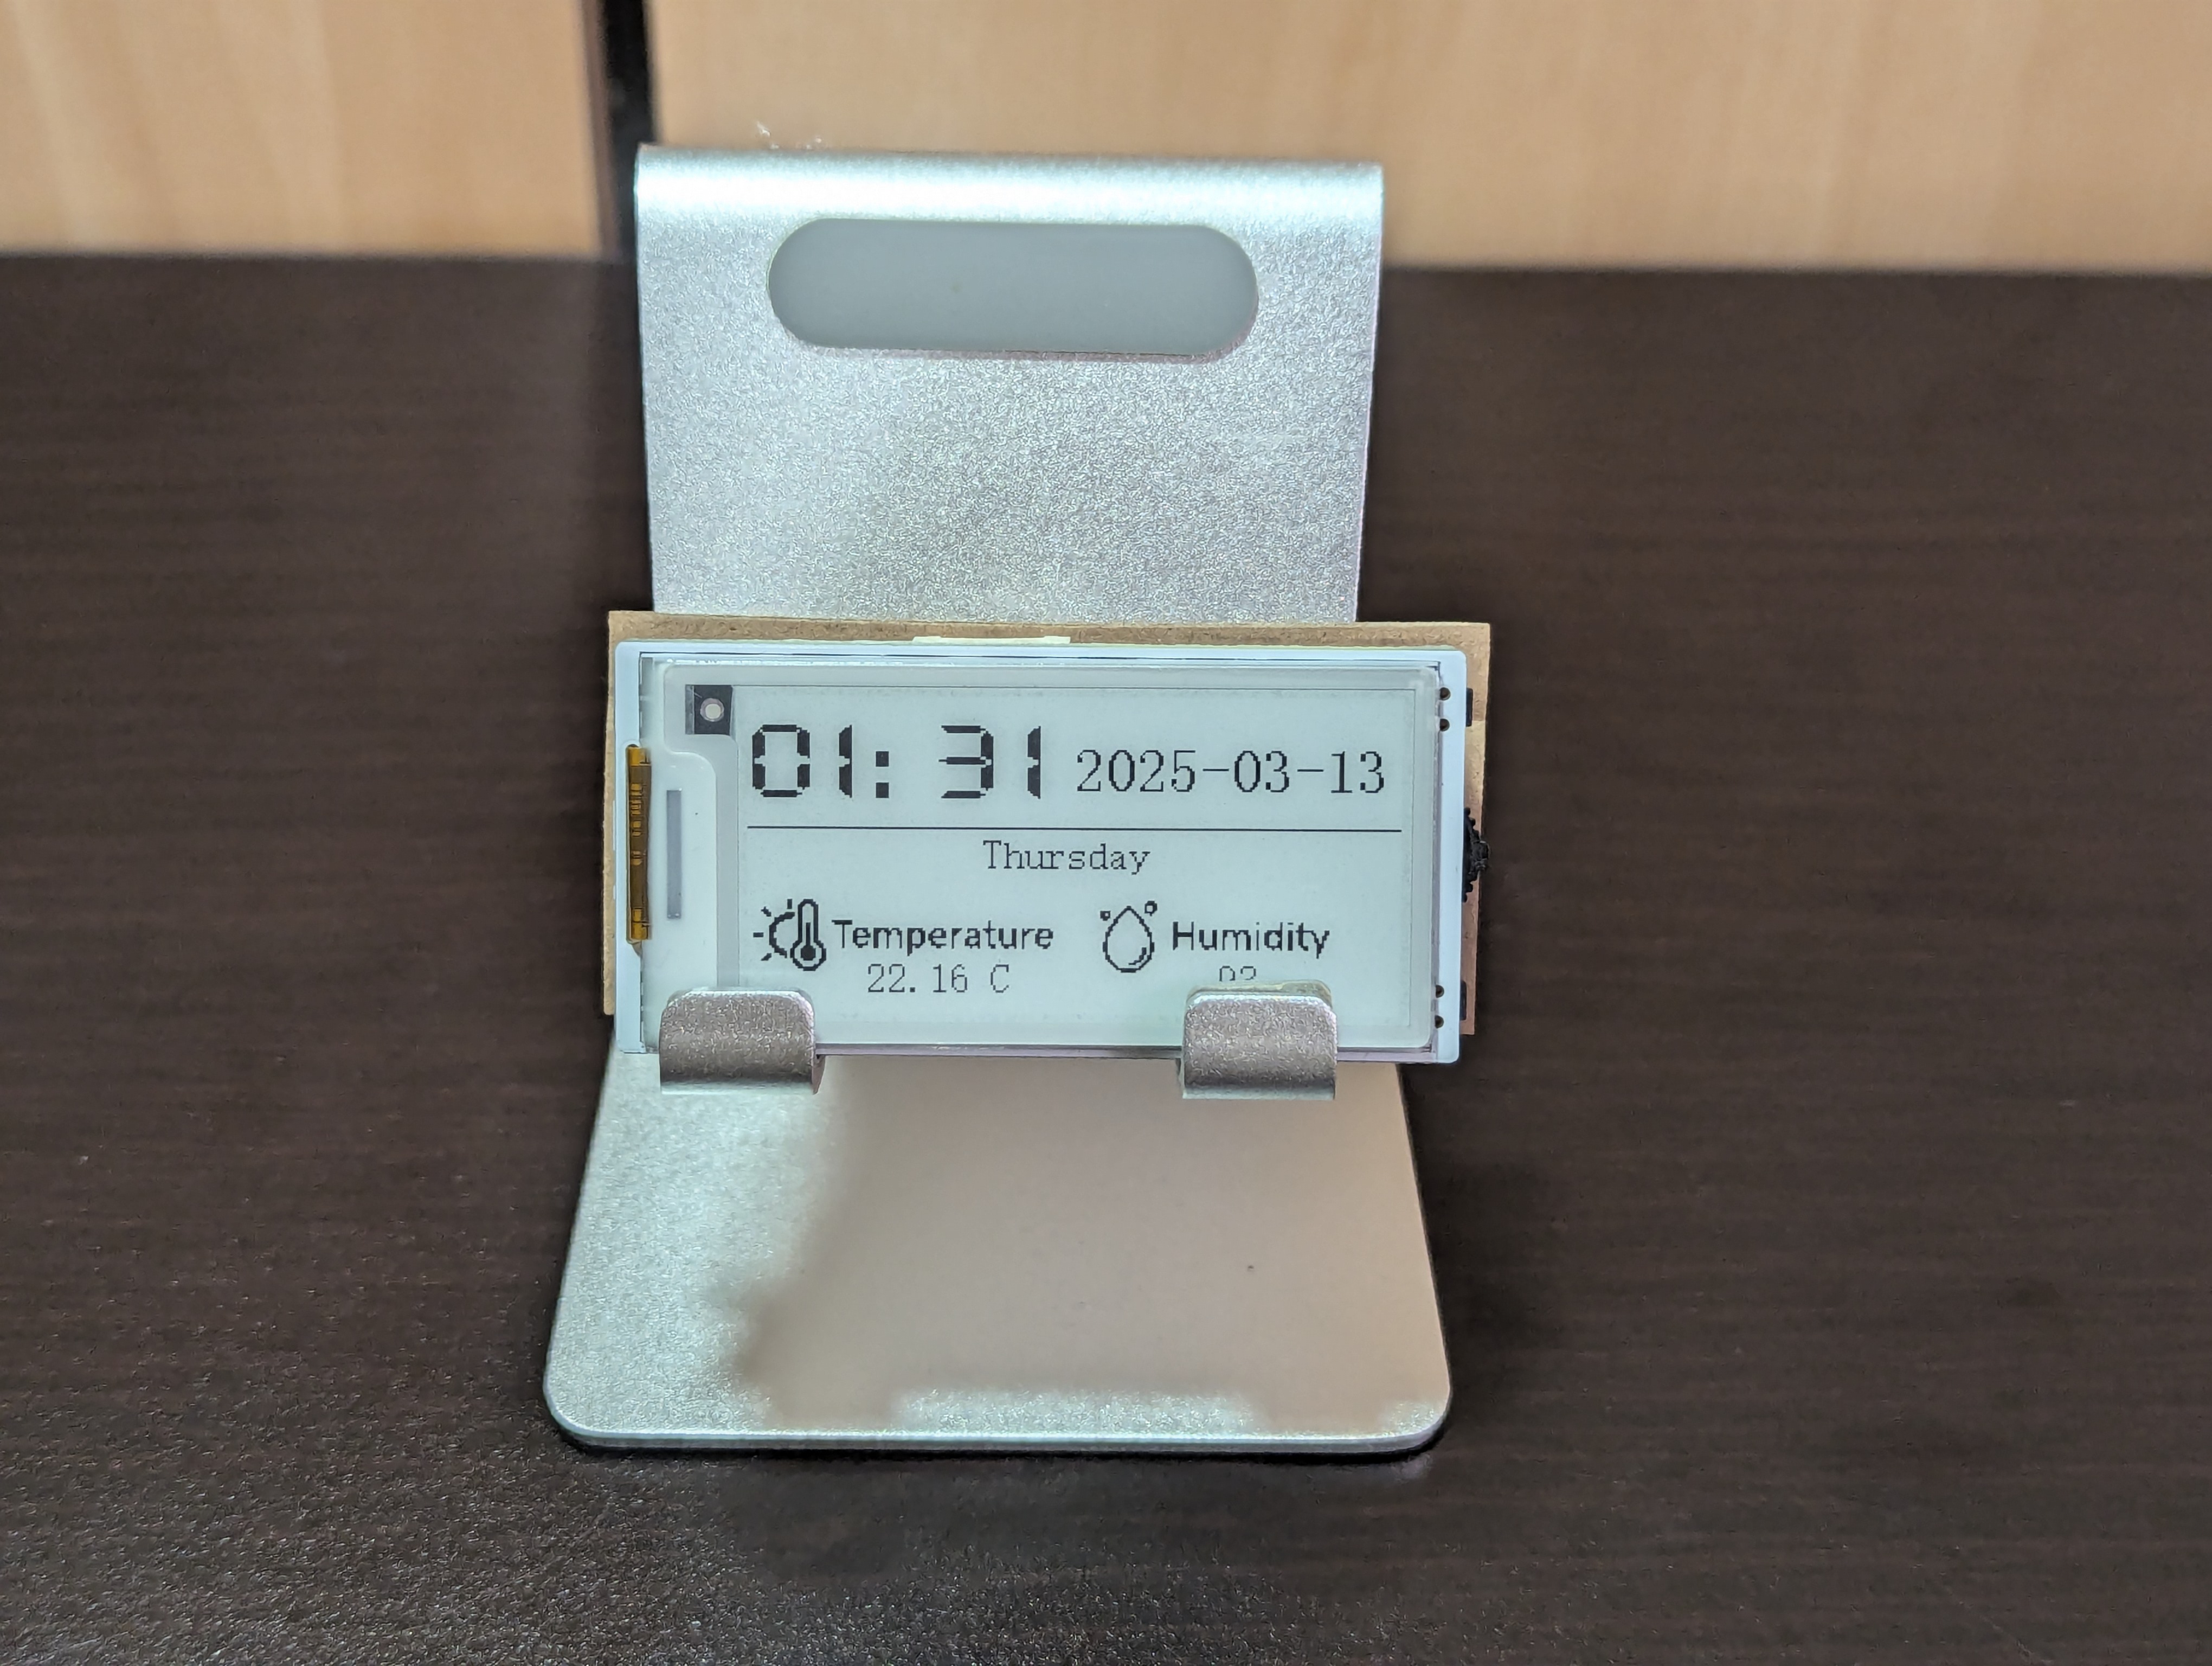
EPD_ShowString(0, 0, buff, BLACK, 48);This displays the current time from the top left of the screen in black with a size 48pt font. Simple enough. As I mentioned earlier, the example project also displays the temperature and humidity, as well as two images, the date, and the day. I didn’t need any of those extra features, so I had a lot more room left on the display.

The size of the display is 122x250, so I should be able to at least double the font size of the time. Naturally, one would try the following change:
EPD_ShowString(0, 0, buff, BLACK, 100);This makes a lot of sense and is what you would expect if you were
working on a website or mobile app, but it doesn’t work in embedded
development. The graphics libraries are much less feature-rich here, and
for good reason. While the ESP32 is pretty powerful for a
microcontroller, it’s still a microcontroller, and performance is key
here. The EPD.cpp graphics library is only 458 lines, including
comments. Let’s look at what EPD_ShowString is actually
doing:
void EPD_ShowString(uint16_t x, uint16_t y, const char *s, uint8_t color, uint16_t sizey)
{
    while ((*s <= '~') && (*s >= ' '))
    {
        if (x > (EPD_W - 1) || y > (EPD_H - 1))
            return;
        EPD_ShowChar(x, y, *s, color, sizey);
        x += sizey / 2;
        s++;
    }
}
The function calls into EPD_ShowChar while performing a
bounds check to make sure we don’t write past the screen dimensions.
Here’s EPD_ShowChar:
void EPD_ShowChar(uint16_t x, uint16_t y, uint8_t num, uint8_t color, uint8_t sizey)
{
    uint8_t temp, sizex, t;
    uint16_t i, TypefaceNum;
    uint16_t x0 = x;
    sizex = sizey / 2;
    TypefaceNum = (sizex / 8 + ((sizex % 8) ? 1 : 0)) * sizey;
    num = num - ' ';
    for (i = 0; i < TypefaceNum; i++)
    {
        if (sizey == 12)
            temp = ascii_1206[num][i];
        else if (sizey == 16)
            temp = ascii_1608[num][i];
        else if (sizey == 24)
            temp = ascii_2412[num][i];
        else if (sizey == 32)
            temp = ascii_3216[num][i];
        else if (sizey == 48)
            temp = ascii_4824[num][i];
        else
            return;
        for (t = 0; t < 8; t++)
        {
            if (temp & (0x01 << t))
            {
                EPD_DrawPoint(x, y, color);
            }
            else
            {
                EPD_DrawPoint(x, y, !color);
            }
            x++;
            if ((x - x0) == sizex)
            {
                x = x0;
                y++;
                break;
            }
        }
    }
}
Now you can see why setting the string size to 100 doesn’t work in
EPD_ShowString. The function only works with font sizes 12,
16, 24, 32, and 48. You can also see that there is some
int8 array called temp which is being used to
draw the points for each character onto the display. The
ascii_size arrays are defined in EPDfont.h and
look like this, which explains what is going on:
const unsigned char ascii_1206[][12]={
{0x00,0x00,0x00,0x00,0x00,0x00,0x00,0x00,0x00,0x00,0x00,0x00},/*" ",0*/
{0x00,0x00,0x04,0x04,0x04,0x04,0x04,0x00,0x00,0x04,0x00,0x00},/*"!",1*/
{0x14,0x14,0x0A,0x00,0x00,0x00,0x00,0x00,0x00,0x00,0x00,0x00},/*""",2*/
{0x00,0x00,0x0A,0x0A,0x1F,0x0A,0x0A,0x1F,0x0A,0x0A,0x00,0x00},/*"#",3*/
{0x00,0x04,0x0E,0x15,0x05,0x06,0x0C,0x14,0x15,0x0E,0x04,0x00},/*"$",4*/

//...

};
Each font size is an array of bitmaps representing a character. The larger the font size, the larger the bitmap. All 96 printable ASCII characters are represented. Each element in the array represents a point on the y-axis, and each bit in each byte represents a point on the x-axis. In fact, the entire display itself is represented as a bitmap:
uint8_t ImageBW[ALLSCREEN_BYTES];and EPD_DrawPoint sets the specified point in the
display bitmap.
So, to increase the font size, I would need to create a new bitmap font array. I looked online for tools to do this, and while I did find some that seem like they would work, they all seemed to have different representations. For example, the LVGL font converter - https://lvgl.io/tools/fontconverter - stored everything in a single bitmap rather than an array of bitmaps. I would also need to find a font that looks good on this display.
Instead, I opted for the simplest solution, which is to upscale the largest font by 2x:
void EPD_ShowCharScaled(uint16_t x, uint16_t y, uint8_t num, uint8_t color, uint8_t sizey)
{
    uint8_t temp, sizex, t;
    uint16_t i, TypefaceNum;
    uint16_t x0 = x;
    sizex = sizey / 2;
    TypefaceNum = (sizex / 8 + ((sizex % 8) ? 1 : 0)) * sizey;
    num = num - ' ';

    for (i = 0; i < TypefaceNum; i++)
    {
        if (sizey == 12)
            temp = ascii_1206[num][i];
        else if (sizey == 16)
            temp = ascii_1608[num][i];
        else if (sizey == 24)
            temp = ascii_2412[num][i];
        else if (sizey == 32)
            temp = ascii_3216[num][i];
        else if (sizey == 48)
            temp = ascii_4824[num][i];
        else
            return;

        for (t = 0; t < 8; t++)
        {
            if (temp & (0x01 << t))
            {
                EPD_DrawPoint(x, y, color);
                EPD_DrawPoint(x + 1, y, color);
                EPD_DrawPoint(x, y + 1, color);
                EPD_DrawPoint(x + 1, y + 1, color);
            }
            else
            {
                EPD_DrawPoint(x, y, !color);
                EPD_DrawPoint(x + 1, y, !color);
                EPD_DrawPoint(x, y + 1, !color);
                EPD_DrawPoint(x + 1, y + 1, !color);
            }

            x += 2;

            if ((x - x0) / 2 == sizex)
            {
                x = x0;
                y += 2;
                break;
            }
        }
    }
}
All we have to do is draw a 2x2 box instead of a 1x1 point. We also
need to draw new points starting from every x+2 and y+2 instead of x+1
and y+1. This gives us 64 and 96 point font sizes. Theoretically, you
could scale to any size using a for loop instead of calling
EPD_DrawPoint directly, but 96pt is already close to the
size of the screen.
We also need to create an EPD_ShowStringScaled function
that calls into EPD_ShowCharScaled:
void EPD_ShowStringScaled(uint16_t x, uint16_t y, const char *s, uint8_t color, uint16_t sizey)
{
    uint16_t scaled_sizex = sizey;
    while ((*s <= '~') && (*s >= ' '))
    {
        if (x > (EPD_W - 1) || y > (EPD_H - 1))
            return;
        EPD_ShowCharScaled(x, y, *s, color, sizey);
        x += scaled_sizex;
        s++;
    }
}
After adding the headers to EPD.h, we can use it to
display the time:
EPD_ShowStringScaled(0, 0, buff, BLACK, 48);If you look closely, you can see that it’s upscaled. But if you look at it from a normal distance, it looks exactly like a regular font. Besides, the web used to use raster fonts, and nobody seemed bothered by that.
That’s all for this review. The entire project took half a day to complete, and 90% of the time was spent on the two issues above. I can’t say much about the durability of the device because I just bought it, but I’ll update this post if I run into any serious issues. In terms of using this device as a clock or dashboard, I can say that it works well and recommend it to anyone wanting to get into e-paper displays, as long as you are aware it won’t work in the dark.